
Tech
Pixel Launcher Dark Mode Guide: Setup, Tips & Fixes (2025)
Introduction
Dark mode is no longer a cool feature, but a necessary part of minimizing the eye strain, saving battery life on OLED displays, and achieving a more personalized smartphone experience. To users of Pixel Launcher, the dark mode integration has gone a long way during 2025 as Google has eliminated the limitations that existed in the first place, offering smarter customization features. Regardless of whether you are using the new Pixel 10 series or are an older Pixel with an Android 16 update, it is possible to drastically improve your daily smartphone life by learning how to use dark mode to its full capabilities. This is an extensive manual that takes new users through simple installation to more detailed troubleshooting, including native functionality and innovative workaround solutions. We will explore the most recent developments made by Google, analyze the most consistent shortcomings, and offer some professional advice to make you navigate the dark mode on your Pixel device.
Table of Contents
What Makes Pixel Launcher Dark Mode Special?
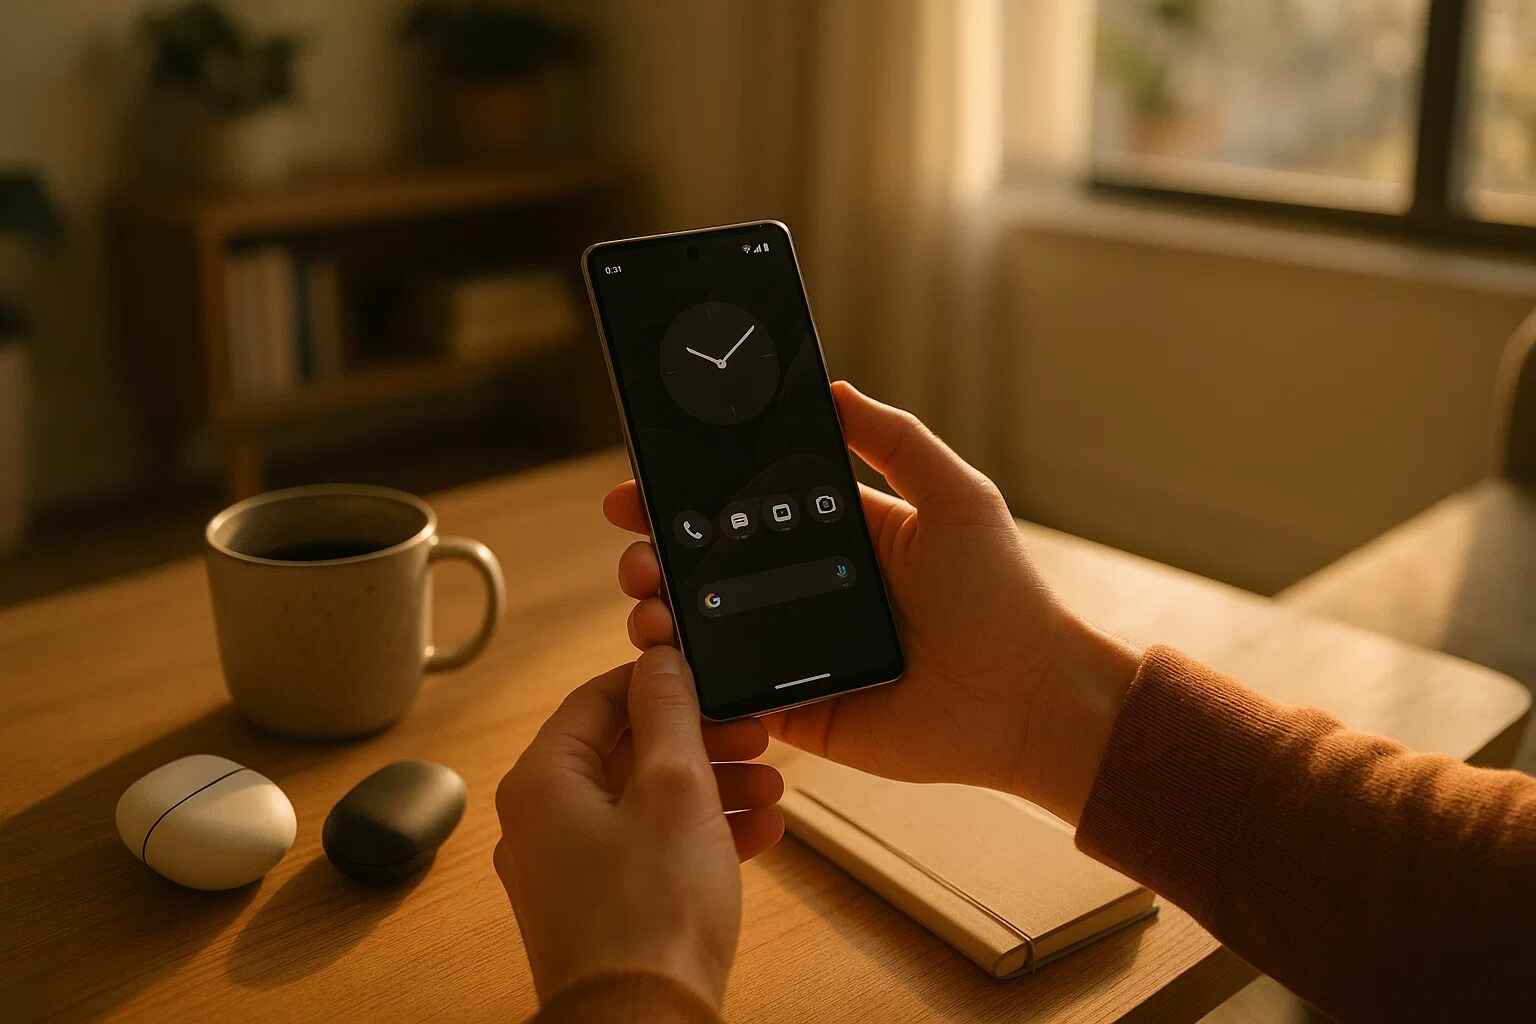
Pixel Launcher’s Deep Dark Mode Integration
As compared to the third-party launchers or other Android skins, Pixel Launcher is built with deep system-level integration of dark mode which is carried across the user interface. Dark mode, when turned on, does not only impact quick settings and notifications but also changes the aesthetic of the whole device, which includes app drawer, folder backgrounds, and the system menus. This brings out an integrated visual feel which most third party launchers find difficult to replicate. The implementation of the Pixel Launcher specifically conforms to the Material You design language of Google, which flexibly modifies colors using your wallpaper to make the device have a personalized look that is vaguely consistent to both light and dark modes.
Material You and Dark Mode Synergy
The inclusion of Material You dynamic theming is one of the most notable aspects to the dark mode of Pixel Launcher. It is an automatic system which will take the colors out of your wallpaper and apply them across the interface, making it a unified color scheme, which changes to light and dark. The colors can also be adjusted smartly when going to dark mode to ensure that you can still read and see the screen but leave your own color scheme intact. The outcome is a dark experience that would seem to be customized specifically to your device and not a mere inversion of colors.
Pros and Cons of Pixel Launcher’s Dark Mode
Pros:
-
System-wide consistency across menus, notifications, and built-in apps
-
Seamless transitions between light and dark themes
-
Automatic scheduling based on time of day or sunset/sunrise
-
Reduced power consumption on Pixel devices with OLED displays
-
Eye comfort during low-light conditions
Cons:
-
Limited third-party app support without forced dark mode
-
Occasional theming inconsistencies with some Google apps
-
Less customization compared to third-party launchers
-
Historical bugs with scheduling functionality
How to Enable and Customize Dark Mode
Step-by-Step Dark Mode Setup
Enabling dark mode on your Pixel device is straightforward:
-
Open the Settings app on your Pixel device
-
Navigate to Display > Dark theme
-
Toggle on “Use dark theme” to enable immediately
-
For automatic scheduling, tap “Schedule”
-
Choose between “Sunset to sunrise” or “Custom schedule”
The sunset to sunrise setting utilises your location information to turn on dark mode when you are in the evening and turn off the dark mode when in the morning. Instead, the custom schedule will enable you to establish particular times of the transitions as well, providing you with a clear control of the time when the theme changes will take place.
Wallpaper-Based Dark Theme Adjustment
The dark-mode of Pixel Launcher also has one of the most creative features of interacting with your wallpaper. The Material You system proposes color themes automatically depending on your current wallpaper and it will change depending on the light and dark modes. For the best results:
-
Choose wallpapers with defined color schemes rather than complex patterns
-
Experiment with both light and dark wallpapers to see how they affect theming
-
Use the Wallpaper & style app to preview how colors will look in both modes
-
Remember that you can manually select color preferences if the automatic selection doesn’t match your taste
Pros and Cons of Dark Mode Customization
Pros:
-
Intuitive setup process with clear options
-
Flexible scheduling based on time or location
-
Visual previews of theme choices before applying
-
Wallpaper-based theming creates a cohesive look
Cons:
-
Limited manual color control without third-party tools
-
No per-app dark mode settings in stock Android
-
Scheduling bugs have been reported in previous versions
Dark Mode Scheduling and Automation
Mastering Dark Mode Schedules
The scheduling feature in Pixel Launcher’s dark mode allows for hands-free automation of your theme changes based on time of day or ambient light conditions. The “Sunset to sunrise” option is particularly useful as it dynamically adjusts to seasonal changes in day length, ensuring your device always switches to dark mode at the appropriate time. For those with consistent routines, the custom schedule option lets you set specific times for theme transitions—perfect for those who want dark mode activated during work hours or other specific periods .
Addressing Scheduling Bugs
Historically, some Pixel users have reported issues with dark mode scheduling, particularly after the Android 16 update. These bugs included:
-
Schedule failure after manual toggling of dark mode
-
Inconsistent application of dark theme at scheduled times
-
Location-based scheduling not activating properly
Most of these problems are resolved during the recent updates to Google, for example, in the August 2025 Pixel update, the error addressed was namely the dark theme option that does not work as intended under certain conditions. In case you have any problems with your schedule, make sure you are on the most recent version of the software available and attempt to change your time schedule preferences .
Pros and Cons of Dark Mode Scheduling
Pros:
-
Automatic operation once configured
-
Location-based scheduling adapts to seasonal changes
-
Energy saving without user intervention
-
Reduced eye strain during evening hours
Cons:
-
Historical reliability issues with scheduling functionality
-
Manual toggle disrupts schedule until reset
-
Limited multiple schedule options throughout day
Themed Icons and Dark Mode: A Perfect Match?
Themed Icons and Dark Mode Integration
Themed icons are one of the most ambitious visual design works by Google, which brings the Material You color palette to the app icons around the system. These icons can be set to dark mode to take on a monochromatic design with colors of your primary theme color, and this design matches all of your home screens. To enable themed icons:
-
Long-press on an empty area of your home screen
-
Select “Wallpaper & style”
-
Toggle on “Themed icons”
-
Observe how icons change between light and dark modes
The January 2025 Pixel update fixed significant issues with themed icons appearing incorrectly in dark mode, resolving problems where “icons showed up in their light mode state after updating” .
Limitations of Icon Theming
Despite improvements, Pixel Launcher’s icon theming still faces limitations:
-
Inconsistent adoption by third-party app developers
-
No support for third-party icon packs without alternative launchers
-
Themed icons sometimes appear washed out in certain conditions
-
No manual control over which apps get themed icons
These have prompted some users to find other solutions, such as third-party launchers with more features in icon customization.
Pros and Cons of Themed Icons in Dark Mode
Pros:
-
Visual consistency with overall system theme
-
Reduced visual clutter on home screen
-
Enhanced aesthetic appeal in dark mode
-
Automatic application without user intervention
Cons:
-
Limited app support from developers
-
No third-party icon pack integration
-
Occasional color inconsistencies
-
Less visual distinction between app icons
Troubleshooting Common Dark Mode Issues
Fixing Common Dark Mode Problems
Even with Google’s improvements, Pixel users may occasionally encounter dark mode issues. Here are solutions to common problems:
-
Dark mode not activating on schedule: Reset your schedule preferences in Settings > Display > Dark theme > Schedule
-
Themed icons displaying incorrectly: Toggle themed icons off and on in Wallpaper & style settings
-
Inconsistent dark mode across apps: Enable Force dark mode in Developer options (note: may cause visual issues)
-
Search bar not respecting dark theme: Restart your device or check for Pixel Launcher updates
The January 2025 update specifically addressed “issue with Pixel launcher themed icon color display in certain conditions,” indicating Google’s ongoing efforts to refine the dark mode experience .
Developer Options for Dark Mode
For advanced users, Android’s Developer options offer additional dark mode controls:
-
Enable Developer options by tapping Build number 7 times in Settings > About phone
-
Navigate to Developer options in System settings
-
Locate “Override force-dark” or “Force dark mode” option
-
Enable to force dark theme on apps that don’t natively support it
Note that this feature may cause visual issues in some applications, as it attempts to invert light interfaces that weren’t designed for dark theme implementation .
Pros and Cons of Troubleshooting Approaches
Pros:
-
Multiple solutions available for common issues
-
Developer options provide advanced control
-
Regular updates from Google address persistent problems
Cons:
-
Some fixes require technical knowledge
-
Force dark mode can cause app instability
-
Temporary solutions may not address root causes
Android 16’s Expanded Dark Mode Feature
Understanding Expanded Dark Mode
Among the most relevant improvements on the dark mode in Android 16, the so-called Expanded dark mode can be named. This is an option in Display settings, in Dark theme options, which cleverly enforces the use of a dark mode on all apps unsupportive of it. Expanded dark mode is a sophisticated algorithm-based technology (as opposed to simple color inversion), and it does not distort the visual quality or images and media like basic color inversion techniques do.
Expanded vs. Standard Dark Mode
Google offers two distinct dark mode options in Android 16:
-
Standard mode: Applies dark theme only to apps and system elements that natively support it
-
Expanded mode: Extends dark theme to incompatible apps using intelligent inversion
The Expanded mode is available as an accessibility option to users with low vision or photosensitivity, but can also be used as a convenience option by dark mode lovers to enable them to have a similar experience with all apps.
Pros and Cons of Expanded Dark Mode
Pros:
-
Comprehensive dark experience across all apps
-
Intelligent inversion avoids simple color flipping
-
Accessibility benefits for sensitive users
-
No root required for system-wide dark mode
Cons:
-
Visual artifacts in some applications
-
Potential readability issues with certain color combinations
-
Not all apps respond perfectly to forced dark mode
-
Slightly increased battery usage on some devices
Third-Party Alternatives and Workarounds
Popular Third-Party Launchers
For users unsatisfied with Pixel Launcher’s dark mode implementation, several third-party launchers offer enhanced customization:
-
Nova Launcher: Extensive dark mode controls with icon pack support
-
Lawnchair Launcher: Pixel-like experience with additional customization
-
Microsoft Launcher: Dark mode integration with Windows ecosystem
-
AIO Launcher: Minimalist interface with emphasis on dark themes
These alternatives typically offer greater flexibility in dark mode implementation, including per-app settings, more scheduling options, and better icon pack integration .
Icon Pack Workarounds
While Pixel Launcher doesn’t natively support third-party icon packs, creative users have developed workarounds:
-
Shortcut maker apps that apply custom icons to specific apps
-
Widget-based solutions that replace app icons with customizable widgets
-
Theme installer apps that modify system themes with root access
These methods vary in reliability and complexity, with some requiring technical knowledge that may be beyond the average user .
Pros and Cons of Third-Party Solutions
Pros:
-
Superior customization options
-
Consistent dark mode across more applications
-
Icon pack support for visual consistency
-
Advanced scheduling and automation features
Cons:
-
Potential performance impact compared to stock launcher
-
Learning curve for new interfaces
-
Possible instability with some third-party options
-
Inconsistent update support from developers
Dark Mode and Battery Life: What to Expect
Battery Savings with Dark Mode
The impact of dark mode on battery life varies significantly depending on your device’s display technology:
-
OLED displays (used in most Pixel phones): Significant power reduction with dark mode
-
LCD displays: Minimal power savings, primarily from reduced processor load
In OLED devices, the pixels are switched on or off, so the black ones are basically turned off. This may lead to a maximum of 30-40 percent of power loss when showing mostly dark contents at high brightness levels. The real savings will be based on the screen brightness, the content on the screen and personal usage habits.
Maximizing Battery Benefits
To maximize battery savings with dark mode:
-
Use true black backgrounds where possible (not just dark gray)
-
Enable dark mode in individual apps that support it
-
Reduce screen brightness when practical
-
Combine with other power-saving measures like adaptive battery
Note that the battery benefits may be less noticeable with mixed content that includes bright elements, as even portions of white content require significant power on OLED displays .
Pros and Cons of Battery Savings
Pros:
-
Extended usage time between charges
-
Reduced power consumption during typical use
-
Cumulative battery health benefits over time
-
Environmental impact reduction from less charging
Cons:
-
Limited benefits with LCD displays
-
Savings vary significantly based on usage patterns
-
Potential trade-offs in readability for some users
-
Not all content benefits equally from dark mode
Future of Dark Mode on Pixel Devices
Android 16 QPR2 Enhancements
The upcoming Android 16 QPR2 update, expected in December 2025, promises further dark mode refinements:
-
Improved app compatibility with forced dark mode
-
Enhanced scheduling reliability with better location detection
-
Additional customization options for themed icons
-
Performance optimizations for smoother theme transitions
These updates continue Google’s pattern of incremental improvements to dark mode functionality with each quarterly platform update .
Long-Term Dark Mode Vision
Google’s long-term vision for dark mode appears focused on:
-
Standardization across Android ecosystem for consistent experience
-
Machine learning enhancements for smarter automatic theming
-
Expanded developer tools to encourage native dark mode implementation
-
Accessibility improvements for users with visual sensitivities
The company’s increased attention to dark mode reflects its growing importance to users and alignment with broader industry trends toward interface personalization and accessibility .
Pros and Cons of Future Developments
Pros:
-
Ongoing improvements from Google’s development
-
Better ecosystem standardization benefits users
-
Advanced features through machine learning
-
Increased accessibility for diverse user needs
Cons:
-
Slow adoption pace for major enhancements
-
Developer resistance to implementing native dark modes
-
Potential compatibility issues with older devices
-
Uncertain timeline for promised features
Expert Tips and Hidden Tricks
Advanced Dark Mode Customization
Beyond basic settings, these expert tips can enhance your dark mode experience:
-
Use ADB commands to force dark mode on stubborn apps:
adb shell settings put secure theme_mode 2 -
Combine with blue light filter for reduced eye strain in evening hours
-
Experiment with different wallpapers to find optimal color extraction for dark mode
-
Enable developer options to tweak animation speeds for faster theme transitions
These advanced techniques require some technical knowledge but can significantly improve the dark mode experience for power users .
Productivity and Dark Mode
Dark mode can enhance productivity in several ways:
-
Reduced eye strain during extended phone use sessions
-
Minimized distractions from less glaring interface elements
-
Better battery longevity for all-day usage without charging
-
Contextual awareness when using phone in dark environments
Many users report increased comfort during extended reading or work sessions when using dark mode, though individual preferences vary significantly .
Pros and Cons of Expert Tips
Pros:
-
Enhanced customization beyond standard options
-
Improved user experience for specific needs
-
Greater control over visual environment
-
Potential performance benefits from optimizations
Cons:
-
Technical knowledge required for some tips
-
Potential instability from advanced modifications
-
Varying results across different device models
-
Time investment needed to implement properly
Frequently Asked Questions
How do I enable dark mode on my Pixel device?
You can also turn on the dark mode of your Pixel mobile device by accessing the settings, display, dark theme and switching on use dark theme. To schedule automatically, select “Schedule” and select between “Sunset-sunrise” or customize and select the times during which the dark mode will automatically turn on.
Why won’t dark mode work on some of my apps?
Not all apps will be supported by dark mode. Expanded mode The Expanded mode setting of Android 16 (Settings Display Dark theme Expanded mode) may be set to put apps that do not support dark mode into the dark mode as well, although this can create visual problems in some applications.
How can I fix dark mode scheduling issues?
In case dark mode scheduling is not functioning well, then go to your display settings and change your schedule under the Dark theme Schedule. In case of scheduling bugs, make sure that your device is kept on the recent software update because Google has already dealt with the scheduling bugs in the recent updates such as the Pixel August 2025 update.
Does dark mode really save battery life on Pixel phones?
Yes, the battery life of Pixel phones with OLED displays (most Pixel models) can be saved tremendously with the dark mode on because of the black pixels being totally disabled. The most prominent conservation is observed at the brighter brightness levels and when watching a content that has darker interfaces.
Conclusion
The dark mode of Pixel Launcher has become a complex feature that can be balanced in terms of aesthetics, functionality, and battery performance. Although the strategy adopted by Google is focused more on integration of systems and simplicity rather than massive customization, recent changes have delivered most of the past constraints and added new innovations that include Expanded dark mode and enhanced themed icons. It is possible that as Android evolves, additional improvements to the dark mode implementation will be made, such as improved compatibility with third-party applications, more scheduling, and individualization. Regardless of whether you are an old Pixel user or are just getting used to the system, learning how to use dark mode can greatly enhance the daily experience on your phone, eliminating eye fatigue, saving money.

Every relationship faces challenges. Even couples who deeply care about each other can experience periods of conflict, emotional distance, trust issues, or communication problems. Life can become busy and stressful, and sometimes partners find themselves feeling disconnected despite their best intentions.
The good news is that relationship difficulties do not always mean a relationship is failing. With the right support, many couples can overcome obstacles, improve communication, rebuild trust, and strengthen their connection.
This is why therapy for couples Toronto has become increasingly popular. More couples are recognising that professional guidance can help them understand relationship challenges, develop healthier communication habits, and create a stronger foundation for the future.
Professional counselling services such as Ellis Nicolson Psychotherapy provide a supportive environment where couples can work through concerns, improve emotional connection, and build healthier relationship patterns.
In this guide, we will explore how therapy for couples Toronto can help struggling relationships, the benefits of professional support, and why more couples are turning to therapy to strengthen their partnerships.
Why Relationships Struggle
Relationships are complex. Two people bring different experiences, personalities, expectations, and communication styles into a partnership.
Over time, challenges may arise that affect relationship satisfaction.
Common issues include:
- Poor communication
- Frequent arguments
- Trust concerns
- Emotional distance
- Financial stress
- Parenting disagreements
- Work-related pressure
- Life transitions
These difficulties are often the reason couples seek therapy for couples Toronto.
Seeking help is not a sign of failure. Instead, it shows a commitment to improving the relationship.
Understanding Couples Therapy
Couples therapy is a professional counselling process designed to help partners improve their relationship.
The purpose of therapy is not to decide who is right or wrong.
Instead, therapists help couples:
- Understand relationship dynamics
- Improve communication
- Resolve conflicts
- Strengthen emotional bonds
- Develop practical relationship skills
A therapist provides a neutral and supportive environment where both partners can express themselves openly.
Why Communication Matters in Every Relationship
Communication is often described as the foundation of a healthy relationship.
When communication is effective, couples are more likely to:
- Feel understood
- Resolve disagreements
- Build trust
- Maintain emotional closeness
When communication breaks down, misunderstandings and resentment can develop.
One of the main goals of therapy for couples Toronto is helping partners improve communication patterns.
Signs That Communication Problems Are Affecting Your Relationship
Many couples do not realise how much communication influences their relationship.
Common warning signs include:
Constant Arguments
Disagreements occur frequently and often remain unresolved.
Feeling Unheard
One or both partners feel ignored or misunderstood.
Avoiding Difficult Conversations
Important issues are left unaddressed because discussing them feels uncomfortable.
Emotional Withdrawal
Partners stop sharing thoughts and feelings openly.
Repeating the Same Conflicts
Arguments follow the same pattern without meaningful resolution.
These challenges can often be addressed through therapy for couples Toronto.
How Couples Therapy Improves Communication
Therapy helps couples identify communication habits that may be creating problems.
Learning Active Listening
Many people listen with the intention of responding rather than understanding.
Therapists help couples develop active listening skills, including:
- Paying full attention
- Avoiding interruptions
- Reflecting understanding
- Showing empathy
These skills often lead to more productive conversations.
Expressing Needs More Clearly
Partners learn how to communicate their needs without criticism or blame.
For example, instead of saying:
“You never listen to me.”
A therapist may encourage:
“I feel frustrated when I don’t feel heard.”
This approach encourages discussion rather than defensiveness.
Understanding Communication Styles
Everyone communicates differently.
Therapy for couples Toronto helps partners recognise and understand each other’s communication preferences.
Rebuilding Trust After Relationship Challenges
Trust is essential for relationship stability.
When trust is damaged, couples often experience:
- Anxiety
- Insecurity
- Emotional distance
- Increased conflict
Many couples seek therapy for couples Toronto because they want to rebuild trust.
Exploring the Source of Trust Issues
Therapy provides a safe environment to discuss difficult experiences and understand what caused the breakdown in trust.
Encouraging Honesty
Open communication is essential for rebuilding trust.
Therapists help couples have honest conversations while maintaining respect and understanding.
Creating Consistency
Trust grows when actions consistently support words.
Therapy encourages accountability and reliability within the relationship.
Strengthening Emotional Intimacy
Emotional intimacy helps partners feel connected and supported.
Unfortunately, stress and unresolved conflict can weaken this connection.
Therapy for couples Toronto helps strengthen intimacy by encouraging:
- Honest communication
- Vulnerability
- Emotional support
- Empathy
As partners learn to communicate more effectively, emotional closeness often improves.
Learning Healthier Conflict Resolution Skills
Conflict is a natural part of any relationship.
The key is learning how to manage disagreements constructively.
Identifying Negative Patterns
Many couples become trapped in cycles of:
- Criticism
- Defensiveness
- Blame
- Withdrawal
Therapy helps identify these behaviours and replace them with healthier alternatives.
Staying Focused on Solutions
Rather than trying to win arguments, couples learn how to solve problems together.
Respecting Different Perspectives
Therapy encourages understanding and compromise rather than competition.
These skills are valuable long after therapy has ended.
Managing Stress Together
External stress often affects relationships.
Common sources include:
- Career pressures
- Financial concerns
- Family responsibilities
- Health issues
When stress increases, communication may suffer.
Therapy for couples Toronto helps partners develop strategies for managing stress while supporting one another.
This creates greater resilience during difficult periods.
Supporting Couples Through Life Transitions
Major life changes can challenge even strong relationships.
Examples include:
- Marriage
- Parenthood
- Relocation
- Career changes
- Retirement
These transitions often require adjustments in communication and expectations.
Therapy helps couples navigate these changes more effectively.
Building Emotional Safety
People communicate more openly when they feel emotionally safe.
Emotional safety means:
- Feeling respected
- Being accepted
- Trusting your partner
- Feeling comfortable expressing emotions
Creating emotional safety is an important focus of therapy for couples Toronto.
When partners feel secure, communication often becomes more open and productive.
The Role of Ellis Nicolson Psychotherapy
Ellis Nicolson Psychotherapy provides counselling services that support individuals and couples facing relationship challenges.
The practice offers a compassionate and supportive environment where clients can explore concerns, strengthen communication, and improve emotional wellbeing.
Areas commonly addressed include:
- Relationship conflict
- Communication difficulties
- Trust concerns
- Anxiety
- Stress management
- Emotional connection
- Life transitions
Therapy is tailored to the unique needs of each couple, recognising that every relationship is different.
This personalised approach helps couples develop practical tools for lasting improvement.
Practical Skills Couples Learn in Therapy
One of the greatest benefits of therapy for couples Toronto is learning practical skills that can be used every day.
Active Listening
Understanding before responding.
Emotional Validation
Acknowledging a partner’s feelings without judgement.
Healthy Boundaries
Respecting personal needs while maintaining connection.
Problem-Solving
Working together towards shared solutions.
Emotional Awareness
Recognising emotions and communicating them effectively.
These skills strengthen relationships both inside and outside the therapy room.
Why Seeking Help Early Matters
Many couples wait until problems become severe before seeking support.
However, therapy is often most effective when issues are addressed early.
Benefits of seeking help sooner include:
- Preventing resentment from building
- Improving communication faster
- Reducing emotional distance
- Strengthening trust before further damage occurs
Early intervention often leads to better long-term outcomes.
Common Myths About Couples Therapy
Therapy Is Only for Relationships in Crisis
Many couples attend therapy to strengthen already healthy relationships.
The Therapist Takes Sides
Professional therapists remain neutral and support both partners.
Therapy Means Failure
Seeking help demonstrates commitment and willingness to improve.
Therapy Provides Instant Results
Meaningful change takes time and consistent effort.
Understanding these misconceptions helps reduce hesitation about seeking support.
Long-Term Benefits of Couples Therapy
The skills learned through therapy for couples Toronto often continue benefiting couples for years.
Many partners report:
- Better communication
- Stronger trust
- Increased emotional intimacy
- Improved conflict resolution
- Greater relationship satisfaction
- Better understanding of one another
These improvements contribute to healthier and more resilient relationships.
Why More Couples in Toronto Are Choosing Therapy
There is growing recognition that healthy relationships require effort and maintenance.
More couples are choosing therapy because they want:
- Better communication
- Stronger emotional connection
- Improved trust
- Greater relationship satisfaction
- Personal growth
Therapy is increasingly viewed as a proactive investment in relationship health rather than a last resort.
Creating a Stronger Future Together
Successful relationships are not built on perfection.
They are built on communication, trust, understanding, and willingness to grow together.
Therapy for couples Toronto helps partners develop these qualities through guided conversations, practical skills, and professional support.
Couples learn how to:
- Communicate openly
- Resolve conflict respectfully
- Support one another emotionally
- Strengthen trust
- Build a deeper connection
These skills help create a stronger future together.
Final Thoughts
Every relationship experiences challenges, but those challenges do not have to lead to permanent disconnection. With the right support, couples can rebuild trust, improve communication, and strengthen their emotional bond.
Therapy for couples Toronto provides a safe and supportive environment where partners can work through difficulties, gain valuable insights, and develop healthier relationship patterns. Through active listening, conflict resolution, emotional awareness, and trust-building strategies, therapy helps couples create lasting positive change.
Professional practices such as Ellis Nicolson Psychotherapy offer personalised support designed to meet the unique needs of each relationship. Whether addressing communication breakdowns, trust concerns, emotional distance, or major life transitions, therapy can provide the tools needed for growth and healing.
For many couples, seeking therapy is not about fixing a broken relationship. It is about creating a stronger, healthier, and more connected partnership that can thrive through life’s challenges. By investing in their relationship today, couples can build a more fulfilling future together and enjoy deeper trust, understanding, and connection for years to come.

Education is, fundamentally, an act of translation. A teacher’s job is to take an abstract concept—a complex chemical bond, a geological formation, or a biological system—and translate it into a language that a student can grasp.
For decades, we relied on two-dimensional tools for this: textbook illustrations, whiteboard diagrams, and projector slides. While effective, these tools lack dimension. A student looking at a cross-section of a human heart on a flat page has to perform mental gymnastics to visualize how the ventricles and atria actually wrap around each other in three-dimensional space.
The introduction of the 3d printer into schools over the last decade was a massive leap forward. Suddenly, students could hold the data in their hands. Kinesthetic learners, who struggle with abstract lectures, could touch and manipulate the geometry.
However, the “first wave” of educational printing had a significant limitation: it was monochrome. A human heart printed in solid grey plastic is certainly better than a drawing, but it is still a “grey blob.” The student still has to memorize which tube is the aorta and which is the vena cava. By upgrading to the new generation of multi-filament technology, educators are removing this final barrier, turning physical models into intuitive, self-explanatory learning aids.
The Cognitive Load of Monochrome
In pedagogy, we talk a lot about “cognitive load”—the amount of working memory resources used to process information. If a student spends 50% of their mental energy just trying to figure out what they are looking at, they have less energy left to understand how it works.
A single-color 3D print often has high cognitive load. Imagine a printed model of a car engine block. In a single color, the pistons, the valves, and the casing all blend together. The student has to squint at the texture to differentiate the parts.
A multi color 3d printer solves this instantly through visual segregation. By printing the engine block in clear or grey, the pistons in metallic silver, and the valves in red, the function of the machine becomes obvious. The eye is guided immediately to the moving parts. The cognitive load drops, and the “Aha!” moment happens faster. The color isn’t decoration; it is instructional scaffolding.
The “Killer App”: Biology and Anatomy
Nowhere is this more critical than in the biology lab. Organic structures are messy. They don’t have straight lines or clear labels.
Consider the standard CPK coloring convention in chemistry, or the anatomical standards in medicine. We are trained to associate Red with oxygenated blood (arteries), Blue with deoxygenated blood (veins), Yellow with nerves, and White with bone or cartilage.
With a multi-material printer, a teacher can produce an anatomical model that adheres to these standards directly off the build plate. A printed kidney section can show the renal pyramids in pink and the collecting ducts in white. A skull model can highlight the different cranial plates in contrasting pastel colors, making the suture lines distinct.
For a medical student or a high school biology student, this is transformative. They aren’t just holding a plastic shape; they are holding a coded data set. They can trace the path of a nerve (yellow) through the foramen of a bone (white) without needing a reference key.
Geography and Topography
The utility extends to the earth sciences as well. Topographic maps are notoriously difficult for younger students to interpret. Understanding that a series of concentric lines on a map represents a steep hill is an abstract skill.
3D printing that data makes it physical. But printing it in multi-color makes it readable. A geography teacher can print a terrain model where the water level is Blue, the lowlands are Green, the mid-elevation is Brown, and the mountain peaks are White.
Suddenly, the concept of “sea level” and “elevation” is visible. Students can see the snow line. They can see how the green valley flows into the blue lake. This application is also vital for explaining geological strata. A core sample printed with distinct layers of color representing limestone, shale, and sandstone allows students to visualize the age of the earth in a way that a black-and-white diagram never could.
The Student as Creator
The benefits aren’t limited to the models the teachers make; they apply to what the students create themselves. Modern STEM education emphasizes “Design Thinking”—the process of empathy, definition, ideation, prototyping, and testing.
When students are tasked with designing a product—say, a custom game controller housing—giving them access to color adds a layer of professional design constraint. They have to decide: Which parts of this object are for gripping? Which are for display? How do I use color to tell the user how to hold it?
This forces them to think like industrial designers. They aren’t just making a shape; they are communicating intent. A student who prints a tool with a “Safety Orange” handle and a “Grey” body is demonstrating a higher level of understanding than a student who prints the whole thing in blue because that was the spool loaded in the machine.
Conclusion: From Novelty to Necessity
For a long time, 3D printers in schools were treated as novelties—machines that sat in the corner of the library printing keychains and Yoda heads. As the novelty wears off, we are focusing on utility.
We know that physical models improve learning outcomes. We know that color coding improves data retention. Combining these two facts makes the argument for multi-material printing undeniable. It bridges the gap between the digital perfection of a CAD file and the physical reality of the classroom.
By embracing this technology, we aren’t just making “prettier” models. We are giving students a clearer, brighter, and more understandable window into the complexities of the world around them. In the fight for student engagement and understanding, color is one of the most powerful tools we have.

For years, there has been a strict divide in the world of display technology. If you wanted immersion and cinematic storytelling, you bought a projector. If you wanted twitch reflexes, competitive framerates, and low latency, you bought a monitor or a high-end gaming TV.
Gamers have historically steered clear of projectors, and for good reason. In the past, connecting a console to a projector was a recipe for frustration. The input lag (the delay between pressing a button and seeing the action on screen) was often upwards of 100 milliseconds—an eternity in a First-Person Shooter (FPS) where reaction times are measured in frames. The images were often washed out, and the refresh rates were sluggish, leading to motion blur that could induce nausea during fast camera pans.
However, the arrival of laser technology has fundamentally altered this landscape. The latest generation of Ultra-Short-Throw (UST) units has bridged the gap, offering specs that don’t just rival gaming TVs but offer an experience that no 65-inch panel can touch. It is time to reconsider the projector as a legitimate weapon in a gamer’s arsenal.
The Latency Myth: Breaking the 15ms Barrier
The single most important metric for any gamer is input lag. In the competitive scene—think Call of Duty, Fortnite, or Valorant—milliseconds matter. A delay means you are dead before you even see the enemy shoot.
Traditional lamp projectors were slow because of the complex image processing required to throw an image across a room. Today’s premium laser units have optimized “Game Modes” that strip away unnecessary post-processing to prioritize speed. We are now seeing laser projectors capable of delivering input lag as low as 8ms at 1080p 120Hz, and sub-15ms at 4K 60Hz.
To put that in perspective, most casual console gamers playing on a standard living room TV are experiencing between 15ms and 30ms of lag. Laser projection has effectively caught up. The button-to-pixel response is now instantaneous enough for everything from rhythm games to fighting games, where frame-perfect timing is essential.
Immersion: The Tactical Advantage of Size
While monitors offer speed, they lack scale. Moving from a 27-inch monitor or a 55-inch TV to a 120-inch or 150-inch projection screen is not just an aesthetic upgrade; it changes how you process the game environment.
In an FPS or an open-world RPG, a massive screen fills your peripheral vision. This creates a sense of presence that VR headsets attempt to simulate, but without the bulky headgear. On a 150-inch screen, distant sniper targets that would be a few pixels wide on a TV become clearly defined objects. You can spot movement on the horizon easier simply because the visual data is physically larger.
Furthermore, a 4k laser projector delivers this size without sacrificing resolution. With next-gen consoles like the PS5 and Xbox Series X pushing native 4K textures, you need a display large enough to actually appreciate the detail. On a small screen, the intricate design of a character’s armor or the texture of distant terrain is lost; on a laser setup, it is rendered in stunning clarity.
The Return of Couch Multiplayer
One of the sadder trends in modern gaming has been the death of split-screen multiplayer. As games became graphically demanding, developers dropped local co-op. But even when games do support it (like Mario Kart or Halo), playing on a split 55-inch TV is miserable. Each player ends up squinting at a tiny quadrant of the screen.
Laser projection revives the golden era of local multiplayer. If you split a 150-inch screen into four quadrants for a Mario Kart tournament, each player gets a 75-inch diagonal display. That is larger than most people’s main TV. This scale transforms social gaming, making it viable to host LAN-party-style events in a single living room without everyone needing their own monitor.
What to Look for in a Gaming Projector
If you are ready to make the switch, you need to look beyond the basic “movie” specs. When you go to shop movie projectors, you typically look for color accuracy and contrast. For a gaming rig, you need to check for three specific features:
- Auto Low Latency Mode (ALLM): This feature, part of the HDMI 2.1 standard, allows your console to automatically tell the projector to switch into “Game Mode” the moment you launch a game. This ensures you never accidentally play with movie processing settings turned on.
- High Refresh Rates (120Hz support): While 60Hz is standard, the ability to accept a 120Hz signal (even at 1080p) is a game-changer for fluidity. It makes camera movement look buttery smooth and reduces motion blur significantly.
- MEMC Technology: Motion Estimation, Motion Compensation helps smooth out video, but for gaming, you often want the ability to turn this off or have it optimized for gaming to prevent the “soap opera effect” from interfering with gameplay precision.
The Verdict
For the professional e-sports athlete whose career depends on a 360Hz refresh rate, a desktop monitor remains the king. But for the 99% of gamers who want to be transported into the worlds of Cyberpunk 2077, Elden Ring, or Zelda, size is the ultimate immersion multiplier.
Laser projectors have finally shed the sluggish performance of their ancestors. They offer the speed required to compete and the scale required to be amazed, proving that the best window into the metaverse might just be your own living room wall.

Technology should make life easier—not more confusing. Yet for many seniors, modern software feels like a maze of updates, passwords, and hidden settings. The good news is that many developers now design software specifically for simplicity, accessibility, and peace of mind. Choosing the right tools can open doors to communication, entertainment, health, and independence—all without frustration. This guide explores the most intuitive software for seniors, highlighting ease of use, clarity, and built-in support.
1. Communication Made Simple: Staying Connected Without Confusion
Staying in touch with family and friends is a top priority for older adults, but complex apps and frequent redesigns often make it difficult.
Best Options:
- Skype and Zoom: These remain two of the easiest video call tools thanks to one-click join links and built-in accessibility features like captioning and screen magnification.
- GrandPad: A tablet and app system made for seniors—large icons, no passwords, and 24/7 live support.
- Jitterbug Smart4: This phone features voice navigation, a simplified interface, and a dedicated customer care line.
Tips for Success:
- Enable auto-login and contact shortcuts.
- Use voice commands to call or message without typing.
- For hard-of-hearing users, enable live captions in call settings.
2. Health and Wellness Apps That Don’t Overwhelm
Monitoring health shouldn’t require navigating endless menus. Modern senior health apps offer automation and visual clarity.
Top Picks:
- MyChart: Easy access to doctors, prescriptions, and lab results—no jargon, just straightforward buttons.
- Pill Reminder Pro: Provides large-font alerts and photo-based pill identification.
- Apple Health & Fall Detection (on iPhone): Automatically tracks steps, heart rate, and safety incidents, alerting contacts if a fall is detected.
Checklist for Ease:
- Choose apps with single-screen dashboards.
- Verify compatibility with smart devices (Apple Watch, Fitbit).
- Turn on auto-notifications for upcoming appointments or medications.
3. Entertainment Without Tech Stress
Streaming music or watching movies should feel like flipping a channel—not decoding a menu.
Best Tools:
- Netflix and YouTube (TV mode): Both provide straightforward menus, large icons, and voice search.
- Spotify “Car Mode” (available in app settings) offers oversized controls and minimal menus.
- Audible: Ideal for book lovers who prefer listening over reading.
Smart Tip: Use a smart TV remote with voice control or connect a tablet to a TV for bigger text and easy browsing.
4. Security Without the Struggle
Seniors are often targeted by scams, so intuitive security software is essential.
Recommended Solutions:
- Norton 360 Deluxe: Runs quietly in the background with minimal pop-ups.
- Bitdefender: Offers “Autopilot Mode,” automatically handling scans and updates.
- Google Password Manager: Syncs safely across devices with autofill enabled.
Quick Safety Steps:
- Use automatic updates for peace of mind.
- Turn on email phishing protection (available in most browsers).
- Consider biometric logins (face or fingerprint recognition) instead of passwords.
5. Creative Tools for Memory, Cards, and Connection
Seniors often enjoy sharing photos, cards, and memories. The right creative tools make it effortless.
Most User-Friendly Software:
- Google Photos: Automatically backs up images, organizes albums, and suggests collages.
- Hallmark Create & Print: Digital version of classic card-making—large text, drag-and-drop simplicity.
Pro Tip: Look for apps that allow offline access, ensuring seniors can enjoy them even without Wi-Fi.
6. Everyday Utility Tools That Actually Help
From reminders to navigation, these simple apps keep daily life running smoothly.
Helpful Software:
- Magnifying Glass + Flashlight (iOS/Android): Turns a phone into an easy reader for menus or receipts.
- Google Maps “Lite” Mode: Simplifies directions and labels, great for low-vision users.
- Evernote Basic: Lets users record notes or voice memos instead of typing.
Ease Checklist:
- Look for larger font settings.
- Enable voice assistance (Google Assistant, Siri).
- Choose apps with offline support for travel.
💻 FAQ: Choosing and Using Software That Works for Seniors
Choosing the right software for seniors isn’t about getting the newest app—it’s about finding tools that feel clear, predictable, and easy to recover from when something goes wrong. The best options reduce clutter, use readable text, and keep important actions obvious instead of buried in menus. This FAQ focuses on practical questions families and older adults ask most. Use these answers as a quick checklist for choosing tech that supports independence and confidence.
Q1: What makes software “senior-friendly”?
A: Clear text, contrast-friendly colors, one-tap functions, and no hidden menus. Apps that require fewer passwords and provide live help rank highest.
Q2: Are there creative tools for making printable cards or family keepsakes?
A: Yes—Adobe Express offers an easy way to make cards to print for free, perfect for birthdays, holidays, and family messages. Other tools like Hallmark’s printables also work well.
Q3: How can seniors avoid confusion when updating apps?
A: Enable automatic updates in the app store. If unsure, ask a family member or use devices with built-in support such as the GrandPad or Jitterbug.
Q4: What accessibility settings should always be turned on?
A: Text size adjustment, screen reader, color contrast, and voice commands improve usability across all devices.
Q5: Is it safe for seniors to store passwords in their browser or phone?
A: Yes, if they use encrypted managers like Google Password Manager or Apple Keychain, which are far safer than written notes or reused passwords.
Technology should empower, not intimidate. By choosing software built for clarity, seniors can connect, create, and protect themselves without needing constant help. The best programs—whether for video calls, health tracking, or creative fun—share a common trait: they remove barriers between action and satisfaction. In short, good software for seniors isn’t about complexity; it’s about comfort, confidence, and control in the digital world.

How Therapy for Couples in Toronto Can Transform Relationships

Francis Leo Murray IV on Why Industrial Real Estate May Be the Most AI-Resilient Asset Class Today

From Texas Roots to Genre Storytelling: The Creative Path of Jesse Dorian

Taylor Swift’s Producer Hints at New Album Release This Year: TS12, Reputation (Taylor’s Version), and All the Clues
麻 豆 传 媒体: A Comprehensive Insight into the Media Powerhouse
